Monday, December 3, 2012

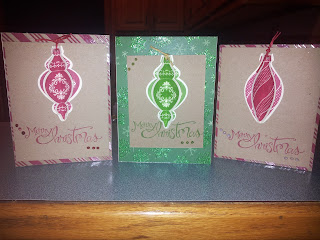
Christmas card with matching gift card bag


Just a quick post before I head off to teach the future citizens of our world! I made these cards using my Stampin' Up Christmas Ornament framelits and the matching stamp set. The paper is from Recollections Sugar Plum paper pack that I bought on Black Friday at Michael's for $7.99!!! (I was so excited to get this paper for this price because it has all kinds of textures in it!) I used a strange type of twine that I also picked up on black Friday, have to admit that it is not the easiest to tie. 
I also made a little gift bag that would be cute to go along with these cards!

This little gift card holder was made using my fabulous cricut, TBB&M cartridge, plain beige card stock, my Stampin' Up Ornaments framelits and matching stamp set! The Merry Christmas stamp set is also from Stampin' Up, Sassy Salutations and Teeny Tiny Wishes. 

Sunday, November 25, 2012

Feeling crafty!

A few weeks back we were in Kohl's and I came across the cutest picture in their home decor section. It was a canvas and had 6 clothes pins and a really cute little saying. But they wanted $39.99 for it and that was the sale price. So I decided that I would try to make my own!!!
I went to Michael's and picked up two painting canvas, they were a package deal and cost $9.99 but I used my 40% off coupon and got them for a little over $5! I brought them home and with paint that I already had on hand (you know the kind that we all buy when it is on sale 2/$1). I painted one of them completely black. I let it dry for several days, not because it took that long but because I work during the day and couldn't sit down and finish it right away. I also spray painted the clothes pins with black spray paint that I had on hand for another one of my crafty projects!!
I sat down yesterday and cut out my saying using Paper Studio paper, my gypsy, Calligraphy Cricut cartridge and Glue. (I really need to learn how to use the Weld option on my gypsy because I was totally going for a different look but just couldn't get it to weld together).
Here is the final project!
The idea behind this project is for me to be able to change out the pictures as the boys get older. The only thing that concerns me is that this leaves the pictures exposed, however I plan to change them out on a regular bases (we will see how that works for me)! 
Thanks for stopping by and I hope you like my project, comments are always appreciated! 

Monday, September 3, 2012

MoJo Challenge 9/3/12 MOJO257


I am not sure about anyone else but my scraps box is always overflowing. So this week I decided that I was only going to use my papers from the scrap box. This is the original sketch for this challenge:
Mojo257Sketch.gif

And this is my creation using this sketch. Mine is very basic but I had a little boy's birthday in mind when I was making it.

Wednesday, August 1, 2012

Gifts for Baseball coaches

~~~Republic Missiles~~~
Our baseball team had an outstanding season. This group of boys played their first season of kid pitch baseball and we ended our season with 37-9-1!!!! We will be having an end of season pool party in a couple of weeks and several mom's got together and decided that we needed to get the coaches something special for all their hard work. I will be making a team scrapbook for our head coach and one of the mom's is organizing parents to go in on a gift card also. But so many times the extra coaches are forgotten. We had four dad's that were awesome with working with the boys and helping them during practices and games. For these four dad's I went out and purchased large wood picture frames to decorate.
I picked up the picture frames for $4.99 at Michael's!
This frame has a glass window (which I have had a hard time finding frames that included the glass). The frames have an easel back plus a hanging hook and you can flip the easel back around to change positions of the frame.
I then picked up some baseball printed paper from Hobby Lobby (on sale 50% off of a normal price of $0.59) The paper is from The Paper Studio. I used Mod Podge glue and a black foam brush and covered the entire frame with the paper. (I first cut the paper to match the frame by using an exacto knife (my favorite cutting tool).
I then cut out the word baseball using the Baseball Cricut cartridge. I cut out a red piece of paper and a white piece of paper using Paper Studio cardstick. I picked up some red leather material from Hobby Lobby and used a ribbon punch to punch holes in the white cardstock and threaded the leather through the holes to give an illusion of a baseball. I used a stamp I picked up at Hobby Lobby and stamped one image in Black using Stampin Up ink Basic Black and then stamped another image in red using Stampin Up ink Real Red. I cut out the large words in red and used foam adhesives from Stampin Up to make those words pop off the page. I picked up some chipboard (a variety pack from Hobby Lobby The Paper Studio and used the 40% coupon)!
This frame is for my husband (who helped coach). Pictured is my 9 year-old son who played 3rd base, pitcher and a couple of games as catcher. I elected not to use their team colors or put their jersey numbers on the frames so that as the kids grow and experience different teams the parents can still use the frame. Our high school colors are black and orange. 
I took this picture using my cell phone and snap it right in front of a window so the picture quality is poor. 
Thanks for stopping by!


Monday, July 23, 2012

Stampin Up PPA139 Sketch Challenge


PPA 139 Sketch Challenge

So this is my first sketch challenge from Stampin Up! 
I used paper from My Minds Eye collection but everything else is Stampin Up products.

My creation. 


Rules for the Runway:
  • We invite you to use ANY brand of products to create your card or papercraft project.
  • Entry should be new and inspired, totally or partially, by this challenge
  • Please use keyword PPA139 when uploading to public galleries.
  • Incorrect links are not eligible for Pals Picks, and may be deleted.
  • Inlinkz will close at Noon (CST) Thursday, July 26th.
  • We'll announce our Pals Paper Artist Picks Tuesday, July 31st.

Thursday, July 19, 2012

Stampin Up!

My Stampin Up! products came in today and I am super excited to start playing with all my goodies! I signed up to be a demonstrator for the discount but I am more then willing to hold a workshop and show you the products that this company has to offer. They have got some really cute holiday products in their new catalog.

Drop me a line at scrapamoment@gmail.com


Friday, July 6, 2012

Cake Box - Tags, Bags, Boxes & More Cartridge

I have not really played around with the Tags, Bags, Boxes and More Cricut Cartridge so I decided to do some research and figure out what people have been doing with this cartridge. I visited My Pink Stamper and she had pictures on her website of these cute Cake Boxes, I was a little disappointed that she didn't have a video showing step-by-step assembly instructions but then again sometimes in life I think that we just have to figure things out on our own. So after a few mistakes and some very frustrated moments I finally came up with a cake box!
Materials Used:
Tags, Bags, Boxes and More Cricut cartridge
Gypsy
ATG Gun
Paper from variety of paper packs (I am horrible and remembering the names)


Thursday, June 28, 2012

Chris and Kyle Layout


Since I have been finishing my degree I have neglected my scrapbooking so now that I have completed my mission and I thought it was time for me to jump back into the fun of crafting! Now I am now a really creative person when it comes to looking at material and coming up with ideas and since I have been away from this for awhile (almost 2 years) I needed some help. Here in our area we have the coolest scrapbooking store called Scrapbook Generations (www.scrapbookgenerations.com). The sale sketchbooks with the coolest ideas to help those of us that get stuck. I used their volume 3 for this layout but I did change a few things. First their layout added ribbon to several of the circles on the left side of the page and on the left side of the page the layout called for two 3x3 pictures and a Title with ribbon in the middle, I chose to make the squares 3x3 but added my boys names to the circles along with the year to the center. 
That is what is nice about using a layout book because it allows you to take an idea and get started but also allows you to add your own touch. 


Materials Used:
Scrapbook Generation Sketches for Scrapbooking Vol. 3
ColorCore Cardstock (Blue)
Paperstudio Boys Live to Rock (Pattern Paper)
Solid color paper came from my scrapbox
Creative Memories square punch 1 1/2"
Gypsy: George and Basic Shapes cartridge (circles) 
Cricut Expression
ATG Gun
StampinUp foam adhesives

Friday, June 1, 2012

I graduated!

Since the last time I posted so much has happened! I finally graduated from college with my degree in Elementary Education! I also graduated with honors of Magna Cum Laude and Alpha Sigma Lambda.

Friday, March 9, 2012

My Clear Dollar Stamp order

I received my order from over at www.cleardollarstamp.com! I was so excited to open the envelope that you would have thought it was Christmas morning. I was a little sad that several of the stamps I had ordered were out of stock but they refunded my money and also sent me the free item even though my order didn't total the required amount after the refund. How awesome is that?
This is a bad picture because I took it at 5:30 in the morning on my cell phone.
This order includes the following Clear Acrylic Stamps and Stickles:
Bank of Kidville
Charlie Baby
Barnyard Mischief
Billy Blasts Off
Dinomite
Monkey Surprise
Playful Pixies
Rosebud
Winter Eskimo
Doll Writing Tablet
Journaling Lines 4
Money Maker
My Little Books
Patchpal Piggy
Patchpal Puppy
Patchpal Skunk
Patchpal Giraffe
Patchpal Kitty
Patchpal Lamby
Stickles:
  Aqua
  Burgandy
  Copper
  Magenta
  Pink
  Platinum
  Purple
Free item: Mini Versus
(ALL this for less then $40)
I am planing on playing with all my new yummy stamps over spring break which starts at exactly 3:30 today!!! Will post pics soon!
Hope everyone has a great weekend!


Wednesday, March 7, 2012

My maternal grandpa

I have only seen one picture of my maternal grandfather and it was old enough and the picture was taken from far away. There has always been this question about what he looks like. My sister has been working on our family tree and has made connection with his last wife and her family. This week my mother received a picture from them of my grandpa. WOW! This was like Christmas. I know that my mom was excited but I have to say that I was also excited to see what he looked like.
He is the one that is leaning on the car, second from the right. I was a little sad that I couldn't see more of his face but also at the same time very excited that this was the most I have ever seen of him. I think he died in 1972 and I was born in 1974. He lived in Washington and I never got to meet him. My mom hadn't seen him since she was 12. There are so many unanswered questions and I can only imagine how many my mom has. But today one of those questions was answered, I now know what my grandfather looks like!!!

Sunday, March 4, 2012

New website adventure!

This morning I was surfing the web and some how came across the coolest website! It is called Clear Dollar Stamps and you can find it at www.cleardollarstamps.com. To make it even better they are not too far from me. How have I never heard of this website? They have some really good deals on their stamps, my first order I went through their clearance pile and they are selling Stickles for $1.25 plus they have tons of stamps for just $1.00.

So excited for my new find! Can't wait to get my order. Will take pics as soon as my order arrives.

Saturday, March 3, 2012

Cricut BLING!

I got a wild hair today and decided to add some bling to my Cricut!
BEFORE
FRONT VIEW
BACK VIEW

Sisters

I made a double layout of pictures from January 1976. I was a year and a half and my sister was three and a half. I used the Sisters paper kit from Paper Studio. Sometimes less is more, I really like how this turned out! Love my sister!

My Christmas Handmade item

I found these at Hobby Lobby. This is the before picture, I think I spent a total of maybe $6 for all three.
This is the after picture. I used some paint, cardstock, a metal tag holder and some ink. I think they turned out pretty cute and was less then $10 to make.
Close up picture, couldn't get the picture to rotate.